
Introduction
If you’re on the lookout for a snack that combines crunch, flavor, and nutrition, look no further than Crunchy Zucchini Wonders. This delightful recipe transforms fresh zucchinis into crispy, golden bites that are perfect for any occasion, whether you’re hosting a gathering or simply craving something wholesome. The appeal of these zucchini wonders lies not only in their satisfying crunch but also in their versatility; they can be enjoyed on their own, dipped in your favorite sauce, or even served as a side dish.
Zucchini, a member of the squash family, is celebrated for its adaptability in various dishes, from savory to sweet. This humble vegetable is rich in water content, making it a light and refreshing choice that can easily transition from a salad ingredient to a star player in a crispy snack. With the rise in popularity of air frying, zucchini has found a new audience, allowing for a healthier preparation method that maintains its natural flavors while cutting down on excess oil.
In this article, we will explore the nutritional benefits of zucchini, delve into the ingredients that make this recipe a winner, and walk you through the essential steps to prepare these delectable Crunchy Zucchini Wonders.
Understanding Zucchini
Zucchini is not just a versatile vegetable; it is also a nutritional powerhouse. A single serving of zucchini is low in calories, high in water, and packed with essential vitamins and minerals. This green vegetable is an excellent source of vitamin C, potassium, and fiber, making it a great addition to a balanced diet. Its low carbohydrate content and high water content make it an ideal choice for those looking to maintain or lose weight while enjoying flavorful food.
The historical context of zucchini is quite fascinating. Originally cultivated in Mesoamerica, zucchini made its way to Europe in the late 19th century, where it quickly became a staple in Italian cuisine. Today, this vegetable is used in a variety of culinary applications, from stir-fries and casseroles to baked goods and snacks. Its mild flavor makes it an excellent canvas for a wide range of spices and seasonings, allowing it to adapt to different culinary traditions and preferences.
Ingredients Breakdown
To create the perfect Crunchy Zucchini Wonders, you will need a selection of fresh ingredients that work harmoniously together. Here’s a detailed breakdown of each ingredient, along with tips for selecting the best options:
Zucchini
When choosing zucchini, look for firm, unblemished specimens that are medium-sized. Smaller zucchinis tend to be sweeter and more tender, while larger ones may have a spongy texture and larger seeds. If you come across different varieties, consider trying yellow zucchini or even striped zucchini for a colorful twist on the classic green variety.
Panko Breadcrumbs
Panko breadcrumbs are a Japanese-style breadcrumb that are coarser and flakier than traditional breadcrumbs. This unique texture is what gives Crunchy Zucchini Wonders their exceptional crunch. Panko absorbs less oil than regular breadcrumbs, allowing for a lighter, crispier coating. If you can’t find panko, you can substitute it with regular breadcrumbs, but the texture may not be as airy and crisp.
Parmesan Cheese
Parmesan cheese adds a savory depth of flavor to the zucchini bites. Its salty and nutty profile complements the mild taste of zucchini perfectly. For those seeking a dairy-free alternative, nutritional yeast can be used to impart a cheesy flavor without the dairy. Additionally, if you prefer a different type of cheese, consider using grated pecorino or a vegan cheese substitute to suit your dietary preferences.
Spices and Seasonings
The right blend of spices and seasonings can elevate your Crunchy Zucchini Wonders to the next level. Garlic powder and onion powder provide a savory foundation, while smoked paprika adds a touch of warmth and depth. A pinch of salt enhances the overall flavor, and freshly cracked black pepper offers a subtle kick. Feel free to experiment with other herbs and spices, such as oregano, thyme, or cayenne pepper, to tailor the seasoning to your taste.
The Role of Egg and Olive Oil
Eggs serve as a binding agent in this recipe, helping the panko and seasonings adhere to the zucchini slices. If you’re looking for a vegan option, aquafaba (the liquid from canned chickpeas) can be used as a substitute for eggs. Olive oil not only helps in achieving a golden-brown crust but also adds a rich flavor. For a different twist, you could use melted coconut oil or avocado oil, both of which are healthy alternatives that can enhance the taste of your zucchini wonders.
Preparing the Zucchini
Now that you have your ingredients ready, it’s time to prepare the zucchini for cooking. Follow these simple steps for washing, slicing, and salting the zucchini to ensure you achieve the perfect crunch in your final dish.
Step 1: Washing
Begin by washing the zucchini thoroughly under running water to remove any dirt or pesticides. Use a vegetable brush if necessary, especially if you prefer to leave the skin on, which adds extra fiber and nutrients.
Step 2: Slicing
Once washed, slice the zucchini into uniform rounds or sticks, depending on your preference. Aim for slices that are about 1/4 inch thick to ensure even cooking. If you cut them too thin, they may burn, while thicker pieces may not crisp up as well.
Step 3: Salting
To enhance the crunchiness of your zucchini, salting is a key step. Place the sliced zucchini in a colander and sprinkle them generously with salt. Allow them to sit for about 15 to 30 minutes. Salting draws out excess moisture from the zucchini, which is crucial for achieving that desirable crispy texture. After the salting period, rinse the zucchini under cold water to remove excess salt, then pat them dry with paper towels. This moisture removal is vital; any leftover moisture can lead to soggy zucchini bites.
Step 4: Preparing for Coating
Now that your zucchini is sliced, salted, and dried, it’s time to set up your coating station. Arrange three bowls: one for the beaten egg (or aquafaba for a vegan option), the second for the mixture of panko breadcrumbs and spices, and the third for the seasoned zucchini. This will streamline the coating process and help you achieve even coverage on each piece.
With these preparations complete, you’re ready to move on to the next steps in creating your Crunchy Zucchini Wonders. This recipe promises a delightful combination of textures and flavors that will leave you and your guests wanting more. Stay tuned for the subsequent sections where we’ll dive into the actual cooking process and share some tips for serving and enjoying these crispy snacks!
{{image_2}}
Creating the Perfect Coating
To achieve the ultimate crunchiness in your Crunchy Zucchini Wonders, the coating is crucial. This section will guide you through mixing the breadcrumb coating, understanding the role of the egg wash, and ensuring a harmonious blend of flavors.
Instructions on Mixing the Breadcrumb Coating
Start by gathering your dry ingredients for the breadcrumb coating. You will need:
– 1 cup of breadcrumbs (panko for extra crunch)
– ½ cup of grated Parmesan cheese (optional for added flavor)
– 1 teaspoon garlic powder
– 1 teaspoon onion powder
– ½ teaspoon paprika
– Salt and pepper to taste
In a medium bowl, combine the breadcrumbs, Parmesan cheese, garlic powder, onion powder, paprika, salt, and pepper. Mix thoroughly until all ingredients are well incorporated. The goal is to create a flavor-packed coating that will elevate the zucchini slices. Using panko breadcrumbs is particularly recommended as they offer a light, crispy texture that enhances the final product.
Tips for Achieving an Even Distribution of Flavors
To ensure that each zucchini slice gets a uniform flavor, consider the following tips:
1. Use Fresh Ingredients: Fresh spices and cheeses will have more potent flavors. Avoid using stale or old pantry items.
2. Mix Well: Use a whisk or fork to break up any clumps in the breadcrumbs and evenly distribute all ingredients.
3. Taste Test: Before coating your zucchini slices, taste a small amount of the breadcrumb mixture. Adjust the seasoning if necessary to ensure it’s flavorful enough.
Explanation of the Egg Wash and Its Purpose in the Recipe
The egg wash is a simple mixture of beaten eggs and a little water or milk. Its primary purpose in this recipe is to act as a bonding agent that helps the breadcrumb coating adhere to the zucchini slices. Without the egg wash, the coating may fall off during cooking, resulting in less crispy chips.
To prepare the egg wash:
1. In a small bowl, crack two large eggs and add 1 tablespoon of water or milk.
2. Whisk until the mixture is smooth and slightly frothy.
This step is crucial for ensuring that the zucchini chips are perfectly coated with the crispy breadcrumb mixture.
Coating the Zucchini Slices
Now that your breadcrumb coating and egg wash are ready, it’s time to coat the zucchini slices.
Detailed Steps for Dipping and Coating Zucchini Slices
1. Prepare Your Workstation: Set up three bowls: one for the egg wash, one for the breadcrumb mixture, and one for the sliced zucchini.
2. Dipping Process:
– Take a zucchini slice and dip it into the egg wash, ensuring it is fully coated on both sides.
– Allow any excess egg wash to drip off before moving to the next step.
3. Coating Process:
– Transfer the egg-washed zucchini slice to the bowl with the breadcrumb mixture.
– Press down gently to ensure the breadcrumbs adhere well. Turn the slice over to coat the other side.
– Place the coated slice on a parchment-lined plate or baking sheet.
4. Repeat: Continue this process until all zucchini slices are coated.
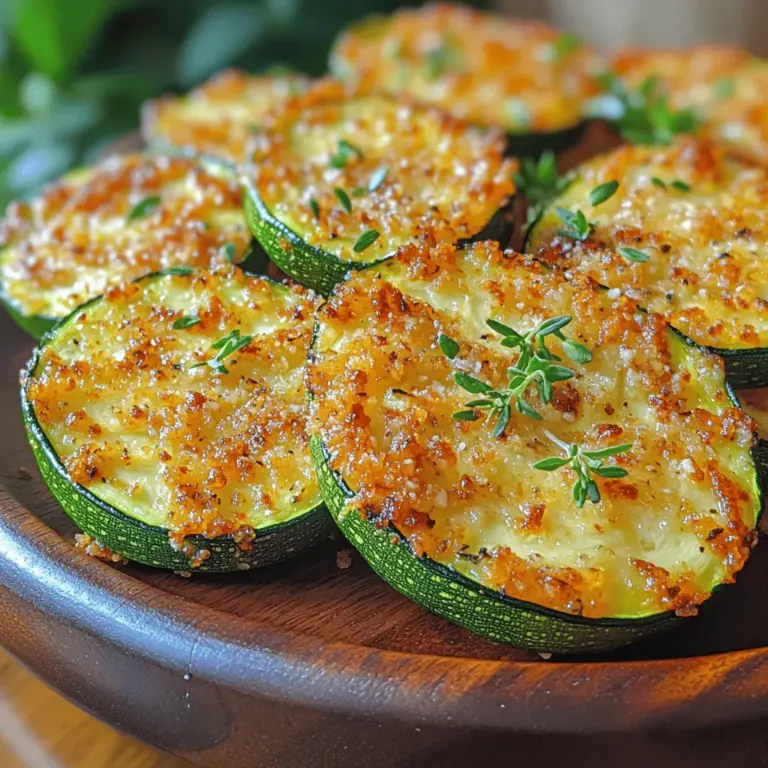
Visual Cues for Recognizing When a Slice is Properly Coated
A properly coated zucchini slice should have an even layer of breadcrumbs covering the entire surface without any visible wet egg spots. The coating should appear slightly golden from the Parmesan cheese, and the breadcrumbs should feel firm to the touch.
Common Mistakes to Avoid During the Coating Process
– Skipping the Egg Wash: The egg wash is essential; skipping this step will lead to a coating that won’t stick.
– Overcrowding the Workstation: Too many slices in the same area can lead to messy handling. Work in batches to maintain cleanliness and efficiency.
– Not Pressing Enough: Gently pressing the zucchini slices into the breadcrumb mixture ensures a better bond, preventing the coating from falling off during cooking.
Air Frying Zucchini Chips
Once your zucchini slices are coated, it’s time to cook them to crispy perfection in the air fryer.
Preheating the Air Fryer: Why It Matters
Preheating your air fryer is crucial for achieving a crispy texture. Just like an oven, an air fryer needs to reach the desired temperature before you add your food. Preheat your air fryer to 400°F (200°C) for about 5 minutes. This step ensures that the heat is evenly distributed, allowing the zucchini chips to cook uniformly.
Arranging Zucchini Slices for Optimal Cooking
To achieve the best results, it’s essential to arrange your coated zucchini slices correctly:
1. Single Layer: Place the slices in a single layer in the air fryer basket. Avoid overcrowding, as this can lead to steaming rather than frying, resulting in softer chips.
2. Leave Space Between Slices: Ensure there is space between each slice to allow hot air to circulate freely.
Cooking Time and How to Achieve Perfect Crispiness
Cook the zucchini slices at 400°F (200°C) for 10-12 minutes. After the first 5-6 minutes, pause the air fryer and check the chips. If they appear golden brown, it’s time to flip them over for even cooking. This flipping process allows both sides to achieve that sought-after crunch.
Tips for Flipping Slices Halfway Through
– Use Tongs: Gently flip each slice using kitchen tongs to avoid damaging the coating.
– Check for Doneness: Look for a golden-brown color and a crispy texture. If they need more time, continue cooking, checking every minute to avoid burning.
Serving Suggestions
Your Crunchy Zucchini Wonders are now ready to be served! Here are some creative and appetizing serving suggestions.
Presentation Ideas for Serving Zucchini Chips
– Plating: Serve the chips on a large platter lined with parchment paper to absorb any excess oil. Arrange them in a circular pattern for an appealing presentation.
– Garnish: Sprinkle with fresh herbs like parsley or basil for a pop of color and added freshness.
– Accompaniments: Consider adding some cherry tomatoes or sliced bell peppers to the platter for a colorful, healthy touch.
Recommended Dipping Sauces: Marinara, Garlic Aioli, and Others
Zucchini chips are delicious on their own, but pairing them with the right dipping sauce can elevate your snacking experience. Here are some fantastic options:
– Marinara Sauce: A classic tomato sauce that complements the crunchiness of the chips.
– Garlic Aioli: A creamy garlic sauce that adds richness.
– Ranch Dressing: For a tangy, herby flavor that many love.
– Spicy Sriracha Mayo: Combine mayonnaise with sriracha for a spicy kick.
Pairing Suggestions for a Complete Meal or Snack Experience
Crunchy Zucchini Wonders can be enjoyed as a snack or as part of a more significant meal. Here are some ideas:
– As a Side Dish: Serve alongside grilled chicken or fish for a wholesome meal.
– In a Salad: Toss the chips into a mixed green salad for added texture.
– On a Charcuterie Board: Include them on a board with cheeses, olives, and other finger foods for a delightful appetizer spread.
Conclusion
In summary, Crunchy Zucchini Wonders are a simple yet incredibly satisfying dish that brings out the best in fresh zucchini. The method of air frying not only delivers a healthier alternative to traditional frying but also retains the delightful crunch we all love.
With their vibrant flavor and crispy texture, these zucchini chips make for a perfect snack or side dish. They are easy to prepare, making them an excellent option for busy weeknights or casual gatherings.
We encourage you to try making these delicious, crunchy zucchini wonders at home. Embrace the joy of cooking with fresh ingredients and the innovative techniques of air frying, and you’ll find that healthy eating can be both satisfying and enjoyable. Happy cooking!
