
Indulge Without Guilt – The Allure of Guilt-Free Peanut Butter Cups
Peanut butter cups have been a beloved indulgence for generations, tempting taste buds with their harmonious blend of creamy peanut butter and rich chocolate. However, traditional recipes often come with a hefty dose of sugar and unhealthy fats, making them a guilty pleasure for many. Thankfully, the culinary world has evolved, and we now have the perfect solution: Guilt-Free Peanut Butter Cups. This delectable alternative allows you to relish the same satisfying flavors without the health drawbacks.
In this article, we will take you through a delightful recipe that not only satisfies your sweet cravings but also aligns with a healthier lifestyle. By using wholesome ingredients, these indulgent treats become a nourishing snack or dessert option. Whether you’re preparing a healthy treat for yourself, impressing guests at a gathering, or seeking a guilt-free dessert, these peanut butter cups are sure to become a staple in your kitchen.
Understanding the Ingredients: A Closer Look at What Makes These Cups Guilt-Free
To fully appreciate the magic of Guilt-Free Peanut Butter Cups, it’s essential to understand the ingredients that make them both delicious and nutritious. Each component is carefully selected to enhance flavor while providing health benefits.
The Power of Natural Almond Flour
One of the primary ingredients in our guilt-free version is almond flour. This nut-based flour stands out as a fantastic alternative to traditional all-purpose flour for several reasons. First and foremost, almond flour is low in carbohydrates and gluten-free, making it suitable for those with dietary restrictions or those looking to reduce their carb intake. Additionally, it is rich in nutrients, including vitamin E, magnesium, and healthy fats, contributing to overall well-being. The nutty flavor of almond flour also complements the sweetness of peanut butter and chocolate, creating a harmonious blend of tastes.
The Role of Natural Peanut Butter
When it comes to peanut butter, opting for unsweetened varieties is key to making these cups healthier. Natural peanut butter is made from ground peanuts, without any added sugars or hydrogenated oils. This ensures that you are getting a product that is rich in protein and healthy fats, along with essential vitamins and minerals. The creamy texture of peanut butter provides not only flavor but also a satisfying mouthfeel that pairs beautifully with chocolate. Choosing a natural option allows you to enjoy the indulgence of peanut butter cups without the excess sugar often found in conventional brands.
Sweetening Naturally: Maple Syrup vs. Agave Nectar
Sweetness is an integral part of any dessert, and in our Guilt-Free Peanut Butter Cups, we have the choice between natural sweeteners like maple syrup and agave nectar. Both options come with their own set of health benefits and unique flavor profiles. Maple syrup is a natural sweetener derived from the sap of maple trees, rich in antioxidants and minerals like manganese and zinc. On the other hand, agave nectar, derived from the agave plant, is sweeter than sugar and has a lower glycemic index, making it a popular choice for those monitoring their blood sugar levels.
When sweetening your peanut butter cups, you can easily adjust the level of sweetness based on personal preference. If you prefer a sweeter treat, feel free to add a little more maple syrup or agave nectar. This flexibility allows you to customize the recipe to suit your taste.
The Richness of Unsweetened Cocoa Powder
Cocoa powder is another star ingredient in this recipe, providing both flavor and health benefits. Unsweetened cocoa powder is loaded with antioxidants, which can help combat oxidative stress in the body. It also contains compounds that may improve mood and enhance overall well-being. The deep, rich flavor of cocoa powder elevates the taste of these peanut butter cups, adding a luxurious depth that is essential for any chocolate lover.
Understanding Dark Chocolate Chips
Finally, let’s discuss the choice of chocolate. Dark chocolate is the preferred option for our Guilt-Free Peanut Butter Cups. Unlike milk chocolate, which is often high in sugar and lower in cocoa content, dark chocolate contains a higher percentage of cocoa solids. This not only results in a more intense chocolate flavor but also offers numerous health benefits, including improved heart health and a wealth of antioxidants. When selecting dark chocolate chips, aim for a variety that contains at least 70% cocoa content for the best flavor and health advantages.
Step-by-Step Instructions: Crafting Your Guilt-Free Peanut Butter Cups
Now that we’ve explored the ingredients that make these peanut butter cups guilt-free, let’s dive into the actual preparation. Crafting your own Guilt-Free Peanut Butter Cups is easier than you might think, and with just a few steps, you can create a delicious treat that you’ll be proud to share or enjoy on your own.
Preparing the Peanut Butter Mixture
Start by preparing the creamy peanut butter filling. In a medium mixing bowl, combine natural peanut butter with a sweetener of your choice—either maple syrup or agave nectar. The ratio is crucial; typically, you want about 1/2 cup of peanut butter for every 2 tablespoons of sweetener. This balance will ensure that the filling is sweet enough without overpowering the natural peanut butter flavor.
Using a spatula or a hand mixer, blend the ingredients until you achieve a smooth and creamy consistency. If desired, you can also add a pinch of salt to enhance the flavor. Make sure to taste the mixture and adjust the sweetness if necessary. Once you’re satisfied with the flavor, set the peanut butter mixture aside while you prepare the chocolate base.
Making the Chocolate Base
Next, it’s time to create the chocolate base for your cups. In a separate mixing bowl, combine almond flour with unsweetened cocoa powder in a ratio of about 1 cup of almond flour to 1/4 cup of cocoa powder. This combination provides a firm yet soft base that holds the peanut butter filling well.
To this dry mixture, add a melted dark chocolate of your choice. The melted chocolate not only adds flavor but also helps bind the ingredients together. Stir the mixture until it reaches a dough-like consistency. If it feels too dry, you can add a little melted coconut oil or additional melted chocolate to reach the desired texture.
Lining the Muffin Tins
Once your chocolate mixture is ready, it’s time to prepare the muffin tins. Line a standard muffin tin with cupcake liners for easy removal later on. If you want a more eco-friendly option, consider using silicone muffin cups that are reusable and help reduce waste.
Spoon a small amount of the chocolate mixture into each muffin liner, pressing it down gently to form an even base. The layer should be thick enough to hold the peanut butter filling but not so thick that it overwhelms the overall flavor. Aim for about a tablespoon of the chocolate mixture in each cup, creating a solid foundation for your delicious filling.
{{image_2}}
Layering the Chocolate Base
Creating a solid foundation is key to making perfect peanut butter cups. Start by melting your dark chocolate or sugar-free chocolate chips in a microwave-safe bowl, heating in 30-second intervals and stirring in between until smooth. This process ensures that the chocolate doesn’t burn and remains silky.
Tips for Ensuring Even Distribution and a Solid Foundation
To achieve a great chocolate base, it’s important to evenly distribute the melted chocolate in your muffin or silicone molds. Use a spoon or a small ladle to pour the chocolate into each mold, filling them about a third of the way full. Tilt the mold gently to ensure that the chocolate coats the sides evenly. This not only creates a beautiful presentation but also ensures that each bite has a consistent texture.
The Significance of Pressing the Mixture Firmly
After pouring the chocolate, take a small spatula or the back of a spoon to press the chocolate down gently. This step is crucial as it helps to eliminate any air bubbles that may form and ensures that the chocolate sets firmly. A well-pressed chocolate base will hold up well once the cups are fully assembled, providing a sturdy shell that complements the creamy peanut butter layer.
Adding the Peanut Butter Layer
Once the chocolate base has set in the refrigerator for about 10 minutes, it’s time to add the peanut butter layer. While your base is chilling, prepare your peanut butter mixture by combining natural peanut butter with a touch of maple syrup or honey for sweetness, and a pinch of salt for flavor balance.
Techniques for Evenly Spreading the Peanut Butter Mixture
To achieve a smooth and even peanut butter layer, use a spoon or a small offset spatula. Scoop a generous amount of the peanut butter mixture and place it on top of the chocolate base. Gently spread it out, ensuring it reaches the edges of the mold. This technique not only enhances the visual appeal but also guarantees that every bite is filled with that delicious peanut butter flavor.
Importance of Filling the Cups to the Right Level for Balance
When filling the cups, aim for a thickness that provides a good balance between the chocolate and peanut butter layers. A common mistake is to overfill the peanut butter layer, which can lead to uneven chocolate coverage on top. Keep the peanut butter layer about half the thickness of the chocolate base, ensuring a delightful combination of flavors without overwhelming the palate.
Topping with Chocolate
Now, it’s time to finish these cups with a luscious chocolate topping. Melt more chocolate using the same method as before, ensuring it remains smooth and pourable.
Melting Chocolate: Methods for a Smooth Drizzle
Besides the microwave, you can also use a double boiler to melt your chocolate. This method allows for more control and reduces the risk of burning. Once melted, allow the chocolate to cool slightly before drizzling. A slightly thicker consistency will help create a beautiful topping without running off the sides.
Creative Ways to Add Texture and Flavor with Chocolate
For an added layer of flavor and texture, consider mixing in some crushed nuts or cocoa nibs into the melted chocolate before drizzling. This not only adds a pleasing crunch but also enhances the overall taste with richer cocoa notes. Alternatively, you can create a marbled effect by swirling in some peanut butter to the top layer before it sets.
Chilling to Perfection
Now that your peanut butter cups are assembled with their chocolate tops, it’s time to chill them again.
Why Chilling is Essential for Setting the Cups
Chilling allows the chocolate to harden and bind the layers together, ensuring that each cup holds its shape when removed from the mold. This step is crucial for achieving that satisfying snap when you bite into your treat.
Time-Saving Tips for Quicker Preparation
If you’re short on time, you can place the cups in the freezer instead of the refrigerator. Just be cautious not to leave them in for too long, as the chocolate can become too hard and difficult to bite into. About 30 minutes in the freezer should provide the perfect firming up.
Serving Suggestions: Enjoying Your Guilt-Free Treats
Once your peanut butter cups are set and ready, it’s time to think about presentation and serving.
Creative Serving Suggestions for Special Occasions
For special occasions, consider arranging the peanut butter cups on a decorative platter or cake stand. You can garnish the platter with fresh fruit, such as strawberries or banana slices, which complement the flavors beautifully. Additionally, drizzling some melted chocolate over the top can create an elegant look that impresses guests.
Pairing Ideas: What to Serve Alongside Your Peanut Butter Cups
These guilt-free treats pair wonderfully with a cup of herbal tea or a glass of almond milk. For a more indulgent experience, serve them alongside a scoop of dairy-free ice cream, creating a delightful contrast of textures and temperatures.
Optional Toppings for Extra Flavor
Enhancing your peanut butter cups with toppings can elevate them to a new level of deliciousness.
Discussing the Benefits of Crushed Nuts or a Sprinkle of Sea Salt
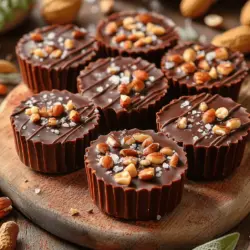
Sprinkling crushed nuts, such as almonds or walnuts, on top of the melted chocolate adds a delightful crunch and enhances the nutty flavor. Alternatively, a light sprinkle of sea salt can heighten the sweetness of the chocolate and peanut butter, creating a perfect sweet and salty combination.
Exploring Additional Toppings for Different Flavor Profiles
For those who enjoy experimenting, consider adding toppings like shredded coconut, mini chocolate chips, or even a drizzle of caramel sauce for a decadent twist. Each variation can offer a unique flavor profile, keeping your peanut butter cups exciting and versatile.
Nutritional Information: Understanding the Health Benefits
As you indulge in these delightful treats, it’s essential to understand their nutritional value.
Analyzing the Calorie Count per Serving
Each peanut butter cup typically contains around 100-120 calories, depending on the specific ingredients used. This makes them a satisfying snack without excessive calories, allowing for guilt-free enjoyment.
Discussing the Role of Each Ingredient in a Balanced Diet
The ingredients in these peanut butter cups contribute various nutrients. Natural peanut butter is a great source of protein and healthy fats, while dark chocolate provides antioxidants. Maple syrup or honey adds sweetness without refined sugars, aligning with healthier eating habits.
Health Benefits of Guilt-Free Peanut Butter Cups
These treats fit well into various dietary lifestyles, making them a versatile choice for many.
How These Treats Fit into Various Dietary Lifestyles (Vegan, Gluten-Free, etc.)
By using vegan chocolate and natural sweeteners, these peanut butter cups can easily cater to vegan diets. Additionally, they can be made gluten-free by ensuring that all ingredients are certified gluten-free, making them an inclusive treat for those with dietary restrictions.
The Importance of Moderation and Mindful Eating
While these peanut butter cups are a healthier alternative to traditional sweets, moderation is still key. Enjoying them mindfully allows you to savor each bite, providing satisfaction without overindulgence.
Conclusion: Satisfy Your Sweet Tooth with Confidence
Creating Guilt-Free Peanut Butter Cups is not only a rewarding experience but also a step towards healthier indulgence. With every bite, you can enjoy the rich flavors of peanut butter and dark chocolate while feeling good about the ingredients you’ve chosen. This recipe not only satisfies your sweet cravings but also aligns with a conscious approach to eating.
Whether you’re making them for yourself or sharing with friends and family, these peanut butter cups promise to deliver joy without the guilt. Enjoy the process of making and savoring these delicious treats, knowing you’re making a choice that benefits your body and your taste buds.