
In recent years, the trend toward healthier snacking has taken the culinary world by storm. As more people prioritize their well-being, the demand for nutritious yet satisfying desserts has surged. Among the myriad of options available, Frozen Banana Snickers Bites stand out as a delectable solution that combines indulgence with health. These guilt-free treats are not only easy to make but also offer a delightful balance of flavors and textures that will please both kids and adults alike.
Imagine biting into a creamy banana surrounded by a rich layer of peanut butter, all enrobed in silky chocolate and topped with crunchy roasted peanuts and a hint of sea salt. The combination of creamy, crunchy, sweet, and salty creates a unique snacking experience that satisfies cravings without derailing healthy eating goals. Made with simple, wholesome ingredients, Frozen Banana Snickers Bites are the perfect option for those seeking a nutritious dessert that doesn’t compromise on taste.
Understanding the Ingredients: A Closer Look at Each Component
To fully appreciate the allure of Frozen Banana Snickers Bites, it’s essential to understand the role each ingredient plays in both flavor and nutrition.
Bananas: Nature’s Sweetness
At the heart of this recipe lies the humble banana, often referred to as nature’s candy. Packed with essential nutrients, bananas are an excellent source of potassium, which plays a crucial role in maintaining healthy blood pressure levels and proper muscle function. Additionally, they provide dietary fiber, aiding in digestion and promoting a feeling of fullness.
In this recipe, ripe bananas serve not only to sweeten the dish naturally but also to contribute a creamy texture that complements the other ingredients. When frozen, their smooth consistency enhances the overall mouthfeel, making each bite a pleasurable experience.
Peanut Butter: The Creamy Element
Peanut butter is the next star of this recipe, delivering a rich, creamy element that elevates the flavor profile. Known for its high protein content and healthy fats, peanut butter is a staple in many health-conscious diets. It provides sustained energy and can help curb hunger, making it an ideal addition to snacks.
When selecting peanut butter for Frozen Banana Snickers Bites, consider the difference between natural and processed varieties. Natural peanut butter, made from ground peanuts without added sugars or hydrogenated oils, offers a purer flavor and better nutritional profile. The choice of peanut butter can significantly impact the final taste and health benefits of this dessert.
Roasted Peanuts: Crunchy Texture
Texture plays an important role in the enjoyment of food, and roasted peanuts add a satisfying crunch to the Frozen Banana Snickers Bites. Not only do they provide a delightful contrast to the creaminess of the banana and peanut butter, but they also enhance the flavor with their rich, nutty notes.
Nutritionally, roasted peanuts are a source of heart-healthy fats, protein, and antioxidants. They contribute to overall well-being while also making the dessert more appealing with their crisp texture.
Chocolate: The Indulgent Coating
No dessert is complete without chocolate, and in this recipe, it acts as an indulgent coating that ties everything together. Whether you opt for dark or milk chocolate, both varieties offer unique benefits. Dark chocolate, in particular, is rich in antioxidants and has been associated with various health benefits, including improved heart health and cognitive function.
The chocolate coating not only adds a layer of richness but also helps to balance the sweetness of the banana and the saltiness of the peanuts. Choosing high-quality chocolate will enhance the overall taste and experience of this treat.
Coconut Oil: A Smooth Finish
To achieve the perfect melting chocolate for coating, coconut oil is utilized in this recipe. Coconut oil not only helps to create a smooth texture but also adds a subtle flavor that complements the other ingredients. Additionally, it contains medium-chain triglycerides (MCTs), which are known for their potential health benefits, including improved metabolism and energy levels.
Using coconut oil in the chocolate coating ensures that it stays glossy and melts beautifully, creating an irresistible finish for your Frozen Banana Snickers Bites.
Sea Salt: Enhancing Flavor
Finally, a sprinkle of sea salt may seem like a small addition, but it plays a significant role in enhancing the overall flavor of the treat. Salt amplifies sweetness and balances flavors, making each bite more satisfying. The contrast between the sweet chocolate and the salty finish elevates the tasting experience, drawing out the deeper flavors of the peanuts and chocolate.
Step-by-Step Instructions: Crafting the Frozen Banana Snickers Bites
Creating your own Frozen Banana Snickers Bites is a straightforward process that requires just a few simple steps.
Preparation of Bananas
Start by selecting ripe bananas, as they provide the best flavor and natural sweetness. Peel the bananas and slice them into thick rounds, about half an inch in width. This thickness allows for a perfect bite-sized treat that holds up well during the freezing process. Keep in mind that overripe bananas can become too mushy, so aim for bananas that are speckled with brown but still firm.
Creating Banana Sandwiches
Once your bananas are sliced, the fun begins. Take a slice of banana and spread a generous layer of peanut butter on top. For optimal flavor balance, aim for about a tablespoon of peanut butter per banana slice—enough to enjoy without overwhelming the sweetness of the banana.
To form the sandwiches, gently press another banana slice on top of the peanut butter, creating a mini banana-peanut butter sandwich. Repeat this process until you have used up all your banana slices. Placing the sandwiches on a parchment-lined baking sheet will make it easier to freeze them later and prevent sticking.
By following these initial steps, you’re well on your way to crafting a delicious and healthy treat that everyone can enjoy. Stay tuned for the next part of the article, where we will delve into the chocolate coating process and the final steps to complete your Frozen Banana Snickers Bites.
{{image_2}}
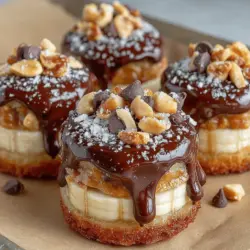
Coating with Roasted Peanuts
Once your banana sandwiches are assembled, it’s time to coat them with roasted peanuts. This step not only adds a delightful crunch but also enhances the overall flavor, making your Frozen Banana Snickers Bites reminiscent of the classic candy bar.
Techniques for Ensuring the Peanuts Adhere Well to the Peanut Butter
To ensure that the peanuts adhere well to the peanut butter layer, start by slightly warming the peanut butter. This will make it more spreadable and sticky, allowing the peanuts to cling better during the coating process. Here’s how to do it:
1. Warm the Peanut Butter: Place the peanut butter in a microwave-safe bowl and heat it for about 10-15 seconds. Stir well to make sure it’s smooth and slightly runny.
2. Roll in Peanuts: After spreading the warm peanut butter on the banana slices, immediately roll each sandwich in the chopped roasted peanuts. The warmth of the peanut butter will help the peanuts stick effectively.
Exploring the Choice of Using Salted vs. Unsalted Peanuts
When it comes to peanuts, you have the option to use salted or unsalted varieties. Salted peanuts offer a savory contrast to the sweetness of the bananas and chocolate, enhancing the overall flavor profile. On the other hand, unsalted peanuts allow for a more controlled sweetness, letting the natural flavors of the bananas shine through. Choose according to your preference or dietary needs!
Chilling the Bites
After coating the banana sandwiches in peanut butter and peanuts, the next crucial step is chilling them. This process is essential for setting the bites and ensuring they hold their shape during the chocolate coating.
Explanation of the Chilling Process and Its Importance in Setting the Bites
Chilling the bites helps to firm up the banana and peanut butter, making them easier to handle and dip in chocolate. This step also prevents the bananas from browning too quickly, preserving their fresh flavor.
Recommended Time for Optimal Firmness
Place the coated banana sandwiches on a parchment-lined baking sheet and freeze them for about 30-60 minutes. This time allows the peanut butter to become firm enough to withstand the chocolate coating without losing its structure.
Melting the Chocolate
Now, it’s time to melt the chocolate, which is a key component of this recipe. Properly melted chocolate ensures a smooth coating that adheres well to the banana bites.
Instructions for the Best Methods to Melt Chocolate Without Burning
There are two popular methods for melting chocolate: the microwave method and the double boiler method.
1. Microwave Method:
– Place your chocolate chips or chopped chocolate in a microwave-safe bowl.
– Heat in 20-second intervals, stirring between each interval until the chocolate is completely melted and smooth.
– Be cautious not to overheat, as chocolate can burn quickly.
2. Double Boiler Method:
– Fill a pot with water and bring it to a simmer.
– Place a heatproof bowl over the pot, ensuring the bottom of the bowl does not touch the water.
– Add your chocolate to the bowl and stir frequently until melted and smooth.
Recommendations for Achieving a Smooth Consistency with Coconut Oil
To enhance the smoothness and give your chocolate a glossy finish, consider adding a teaspoon or two of coconut oil to the chocolate as it melts. This addition helps to thin out the chocolate, making it easier to dip the bites and ensuring a beautiful coating.
Dipping Technique
With your chocolate melted and ready, it’s time to dip the banana sandwiches.
Tips for Coating the Banana Sandwiches Evenly with Chocolate
– Use a Fork: To dip the bites, use a fork to lower each sandwich into the melted chocolate. This allows for better control and minimizes the mess.
– Coat Completely: Make sure to coat each banana bite thoroughly, ensuring that every part is covered in chocolate.
Importance of Allowing Excess Chocolate to Drip Off
After dipping, gently shake the fork to allow any excess chocolate to drip off before placing the coated bites back onto the parchment-lined sheet. This step helps prevent the bites from becoming overly thick, ensuring a delightful balance of chocolate to banana flavor.
Garnishing for Extra Flavor
To add that extra touch, consider garnishing your Frozen Banana Snickers Bites.
Ideas on How to Creatively Garnish with Sea Salt or Mini Chocolate Chips
– Sea Salt: A sprinkle of flaky sea salt on top of the chocolate before it sets enhances the flavor and adds a sophisticated touch.
– Mini Chocolate Chips: For an added layer of chocolatey goodness, sprinkle mini chocolate chips over the bites right after dipping them in chocolate.
The Impact of Garnishing on the Overall Presentation
Garnishing not only elevates the flavor but also enhances the visual appeal of your treats. A well-garnished Frozen Banana Snickers Bite looks more enticing, making it a perfect dessert for gatherings or a delightful treat for yourself.
Final Freezing Process
The last step before enjoying your Frozen Banana Snickers Bites is the final freeze.
Explanation of How the Final Freeze Solidifies the Bites for the Best Texture
Once the bites are coated and garnished, return them to the freezer. This freezing process solidifies the chocolate coating, ensuring that the bites maintain their shape and texture when you take a bite.
Suggested Freezing Time for Optimal Results
Freeze the bites for an additional 1-2 hours. This time allows the chocolate to completely harden and the banana to remain firm, resulting in a creamy yet crunchy texture that is simply irresistible.
Serving Suggestions: Enjoying Your Frozen Banana Snickers Bites
Now that your treats are ready, let’s explore the best ways to serve them.
Ideas for Serving the Bites, Highlighting Their Versatility as a Snack or Dessert
Frozen Banana Snickers Bites are incredibly versatile. They can serve as a delicious snack, a quick dessert, or even a fun treat at parties. Simply arrange them on a platter and watch them disappear!
Discussion on How to Store the Bites in the Freezer for Long-Lasting Enjoyment
Store any leftovers in an airtight container in the freezer. This way, you can enjoy these delightful bites whenever the craving strikes. They can last up to a month, but we doubt they’ll last that long!
Suggestions for Pairing with Beverages or Other Desserts for a Delightful Treat
For a complete indulgent experience, consider pairing your bites with a glass of almond milk or a cold brew coffee. They also complement well with a scoop of dairy-free ice cream for a decadent dessert option.
Health Benefits: Why Frozen Banana Snickers Bites Are a Smart Choice
Beyond their deliciousness, these Frozen Banana Snickers Bites come with a range of nutritional benefits.
Overview of the Nutritional Benefits of the Entire Recipe
– Bananas: Rich in potassium, fiber, and essential vitamins, bananas provide natural sweetness and energy.
– Peanut Butter: Packed with protein and healthy fats, peanut butter helps keep you full and satisfied.
– Dark Chocolate: A source of antioxidants, dark chocolate can offer heart health benefits and improve mood.
Discussion on the Advantages of Choosing Homemade Snacks Over Store-Bought Options
Making your own snacks at home allows you to control the ingredients, ensuring they are free from preservatives and unnecessary additives. You can also customize the sweetness, making them as healthy as you want.
Insight into How These Bites Fit into Various Dietary Lifestyles (Vegan, Gluten-Free)
These bites are naturally vegan and gluten-free, making them suitable for a variety of dietary preferences. They are an excellent choice for anyone looking for a healthier alternative to store-bought sweets.
Conclusion: The Joy of Homemade Treats with Nutritional Benefits
In conclusion, making Frozen Banana Snickers Bites is not only a fun and creative kitchen project but also an opportunity to indulge in a treat that is both delicious and nutritious. The combination of bananas, peanut butter, roasted peanuts, and chocolate provides a satisfying snack that caters to your sweet tooth without compromising your health goals.
The ease of preparation allows anyone, regardless of cooking experience, to whip up these delightful bites in no time. Moreover, the use of wholesome, natural ingredients offers peace of mind when it comes to enjoying a sweet treat.
We encourage you to experiment with variations of this recipe—try adding shredded coconut, using different nut butters, or even incorporating other fruits. The possibilities are endless, and the joy of homemade treats awaits you with every bite. Enjoy the delightful crunch, creamy texture, and the satisfaction of knowing you’ve made a healthy indulgence right in your kitchen!