
Introduction
Welcome to the delicious world of homemade snacks! Today, we’re diving into a recipe that perfectly balances health and indulgence: Choco-Banana Bliss Oat Bars. These delectable treats are not only easy to make but also packed with nutritious ingredients, making them an ideal snack for any time of day. Whether you’re looking for a quick breakfast option, an afternoon pick-me-up, or a wholesome dessert, these oat bars are sure to satisfy your cravings while fueling your body. Let’s explore the benefits of the ingredients, the straightforward preparation process, and some creative ways to enjoy these delightful bars.
In recent years, the demand for healthy snacks has surged, driven by a growing awareness of nutrition and wellness. As more people seek to lead healthier lifestyles, the appeal of homemade snacks has never been greater. Among the myriad of options available, Choco-Banana Bliss Oat Bars stand out for their unique combination of taste and nutritional benefits. With the rich flavor of bananas and the indulgence of dark chocolate, these bars are not only enjoyable but also serve as a guilt-free treat.
The Nutritional Benefits of Choco-Banana Bliss Oat Bars
Understanding the Key Ingredients
To appreciate the full value of Choco-Banana Bliss Oat Bars, let’s take a closer look at their key ingredients:
– Bananas: Often referred to as nature’s candy, bananas are a fantastic natural sweetener. They provide a quick energy boost and are loaded with potassium, which is essential for maintaining healthy muscle function and regulating blood pressure. Additionally, bananas are rich in vitamins such as B6 and C, making them an excellent addition to any diet.
– Rolled Oats: These little grains are a powerhouse of nutrition. Rolled oats are an excellent source of dietary fiber, which aids in digestion and helps regulate blood sugar levels. They keep you feeling full for longer periods, making them an ideal choice for those looking to manage their weight.
– Nut Butter: Whether you choose almond, peanut, or cashew butter, nut butters are packed with healthy fats and protein. They help in muscle repair and promote satiety, ensuring that you feel satisfied after your snack. The fats found in nut butter are also essential for good heart health.
– Honey or Maple Syrup: These natural sweeteners not only provide a pleasant flavor but also come with health benefits. Honey is known for its antimicrobial properties, while maple syrup contains antioxidants. Both are excellent alternatives to refined sugars, making them a healthier choice for sweetening your snacks.
– Dark Chocolate: A beloved ingredient for many, dark chocolate is not just delicious; it’s also rich in antioxidants, which help combat oxidative stress in the body. Studies have shown that moderate consumption of dark chocolate can improve heart health and even enhance mood, making it a guilt-free indulgence in your oat bars.
– Walnuts or Pecans: While optional, adding nuts like walnuts or pecans can elevate your oat bars with a satisfying crunch. These nuts are rich in omega-3 fatty acids, which are known for their anti-inflammatory properties and benefits for brain health.
Step-by-Step Guide to Making Choco-Banana Bliss Oat Bars
Prepping Your Kitchen
Before diving into the recipe, it’s essential to prepare your kitchen for the cooking process. Start by gathering all the necessary ingredients and tools. You’ll need ripe bananas, rolled oats, your choice of nut butter, honey or maple syrup, dark chocolate, and optional nuts. Additionally, make sure you have a mixing bowl, a spatula, and a baking dish ready. Preheat your oven to 350°F (175°C) to ensure it’s at the right temperature when your mixture is ready for baking.
Combining Wet Ingredients
The first step in making your Choco-Banana Bliss Oat Bars is to combine the wet ingredients. Begin by thoroughly mashing the bananas in a mixing bowl. The riper your bananas are, the sweeter and more flavorful your bars will be, so look for bananas with plenty of brown spots. Once the bananas are mashed into a smooth consistency, add in your chosen nut butter, honey or maple syrup, and a splash of vanilla extract. Mix these ingredients together until the texture is smooth and well combined. This step is crucial, as it forms the base of your oat bars and contributes to their delightful flavor.
Mixing Dry Ingredients
Next, it’s time to incorporate the dry ingredients. In a separate bowl, combine your rolled oats with any spices you might want to add, such as cinnamon for warmth or a pinch of salt to balance the sweetness. If you’re opting for nuts, this is the stage to chop and add them into the mixture as well. Stir the dry ingredients together until they are evenly mixed. This will ensure that each bar has a consistent texture and flavor profile.
Now that you have both your wet and dry ingredients prepared, you’re just a few steps away from creating these scrumptious Choco-Banana Bliss Oat Bars. In the next part of this recipe, we will look at how to combine these mixtures and prepare them for baking, resulting in a snack that’s not only nourishing but also incredibly tasty. Stay tuned for the next steps and get ready to indulge in a healthy treat that you can enjoy anytime!
{{image_2}}
Blending the Mixtures
Once you have prepared your wet ingredients, it is time to blend them with the dry mixture. In a separate bowl, whisk together the rolled oats, baking powder, ground cinnamon, and salt. This step is crucial because it ensures that all the dry ingredients are evenly distributed, which will lead to a well-textured bar.
After whisking, gradually combine the wet ingredients with the dry mixture. Use a sturdy spatula or wooden spoon to mix them together, stirring until the mixture forms a thick, cookie dough-like consistency. This texture is important as it helps the bars hold their shape during baking, ensuring a satisfying chewiness in each bite.
Adding Chocolate and Nuts
Now comes the fun part—folding in the chocolate and nuts! Gently add the dark chocolate chips and any optional nuts you wish to include, such as walnuts or pecans. These ingredients not only enhance the flavor of the bars but also add a delightful crunch. When folding, be careful not to overwork the dough; you want to combine the ingredients just until they are evenly mixed. Overmixing can lead to tough bars, which we definitely want to avoid.
Baking the Bars
With the mixture fully combined, it’s time to transfer it into your prepared baking dish. Spread the oat mixture evenly across the dish, pressing it down firmly to ensure the bars stick together during baking. This step is essential for achieving that perfect bar shape, so don’t skip it!
Place the baking dish in the preheated oven and bake for approximately 25-30 minutes. Keep an eye on the edges; they should turn a light golden brown, indicating that the bars are cooked through. The aroma wafting from the oven will be irresistible, making your kitchen smell like a cozy bakery.
Cooling and Storing
Once the baking time is up, remove the dish from the oven and let it cool. Allowing the bars to cool in the baking dish is important as it helps them set properly. After about 10-15 minutes, you can lift the bars out using the edges of the parchment paper. If you didn’t use parchment paper, carefully run a knife around the edges to loosen them before transferring to a cutting board.
Once fully cooled, cut the mixture into squares or bars, depending on your preference. To store your Choco-Banana Bliss Oat Bars, place them in an airtight container. They can be kept at room temperature for a few days, or you can refrigerate them for a longer shelf life. Enjoying them fresh is always best, but these bars also freeze well, making them a convenient snack option for busy days.
Presentation Ideas for Your Oat Bars
Creating an appetizing presentation for your Choco-Banana Bliss Oat Bars can elevate your snacking experience. Here are some tips to make your oat bars not only delicious but also visually appealing:
Tips for Serving
1. Stack on a Decorative Plate: Arrange the bars in a neat stack on a beautiful plate. This simple presentation can instantly make your homemade bars feel gourmet.
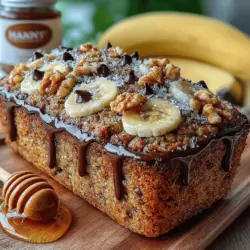
2. Drizzle with Melted Dark Chocolate: For an extra touch of indulgence, melt some dark chocolate and drizzle it over the bars. This adds a rich flavor and makes them look appealing with the glossy finish.
3. Garnish with Banana Slices: Fresh banana slices on top not only enhance the visual appeal but also complement the flavor of the bars. You can also sprinkle crushed nuts or seeds for additional texture and taste.
4. Serve with a Dip: Consider serving the bars with a side of yogurt or nut butter for dipping. This adds an interactive element to your snack and enhances the overall taste experience.
5. Use Wrapping for Gifts: If you’re looking to share your oat bars, consider wrapping them individually in parchment paper and tying them with twine. This makes for a charming gift or a delightful addition to a snack basket.
Conclusion
Choco-Banana Bliss Oat Bars are a delightful and nutritious option for anyone looking to enjoy a homemade snack without sacrificing health. With their simple ingredients, easy preparation, and versatility, these bars can easily become a staple in your kitchen.
Enjoy them as a quick breakfast, a post-workout snack, or a sweet treat to share with friends and family. By making these bars at home, you control the ingredients and tailor them to your taste, ensuring a satisfying and wholesome indulgence.
Embrace the joy of cooking and treat yourself to these delightful oat bars today! They are not only delicious but also provide a great source of energy and nutrients. Perfect for busy mornings or a midday pick-me-up, these bars are sure to become a favorite in your household. So gather your ingredients and get started on this fantastic recipe—you won’t regret it!