Chill Out Cookies ‘n Cream Bars Recipe
Introduction
As the summer sun blazes down, the search for refreshing desserts becomes paramount. No-bake treats and frozen delights have surged in popularity for their ability to deliver sweetness without the need for a hot oven. Among these delightful summer indulgences, Cookies ‘n Cream Bars stand out as a quintessential choice. These bars encapsulate the beloved flavor profile of cookies and cream, providing a nostalgic experience that resonates with dessert lovers of all ages.
The appeal of Cookies ‘n Cream Bars lies not only in their delicious flavor but also in their effortless preparation. With a quick assembly process and minimal cooking required, these bars can be whipped up in no time, making them an ideal option for summer gatherings, picnics, or a simple treat to enjoy on a warm day. As families and friends gather to celebrate the season, these bars offer a sweet respite, allowing everyone to chill out and savor the moment.
The Allure of Cookies ‘n Cream Desserts
The combination of cookies and cream has long captured the hearts and taste buds of dessert enthusiasts. The rich and creamy essence of vanilla ice cream paired with the iconic crunch of chocolate cookies creates a harmonious balance that evokes nostalgia. Whether it’s a scoop of cookies and cream ice cream in a cone or a slice of a cookies and cream cake, this flavor combination is universally adored.
Cookies ‘n Cream Bars take this beloved flavor and transform it into a convenient and shareable format. Perfect for summer parties, backyard barbecues, and family picnics, these bars cater to the sweet tooth while providing a refreshing treat that can be enjoyed outdoors. Their cool, creamy texture is a perfect antidote to the summer heat, making them a go-to dessert for any warm-weather occasion.
Ingredients Breakdown
To create the perfect batch of Cookies ‘n Cream Bars, it’s essential to gather high-quality ingredients that work in harmony to deliver a delightful flavor and texture. Here’s a breakdown of the key components that make these bars irresistible:
– Vanilla Yogurt: This creamy base infuses the bars with a rich, smooth texture while contributing a subtle tang that balances the sweetness. Opt for a high-quality, full-fat vanilla yogurt for the best results.
– Heavy Cream: Adding richness and a velvety mouthfeel, heavy cream is crucial for achieving the desired consistency. When whipped, it provides a lightness that complements the other ingredients beautifully.
– Sweetened Condensed Milk: This ingredient brings a luscious sweetness and creamy depth to the bars. It acts as a binding agent, ensuring that the bars hold their shape when chilled.
– Pure Vanilla Extract: A splash of pure vanilla extract amplifies the flavor, enhancing the overall profile of the dessert. Avoid imitation vanilla for a more authentic taste.
– Oreo Cookies: The star ingredient, Oreos, deliver the classic cookie crunch and deep chocolate flavor that defines cookies and cream. Their crumbled texture throughout the bars adds an enjoyable contrast to the creamy filling.
– Mini Chocolate Chips (optional): For those looking to add an extra layer of sweetness and texture, mini chocolate chips can be sprinkled throughout the mixture. They melt slightly, creating pockets of rich chocolate flavor in every bite.
– Pinch of Salt: A small pinch of salt helps to balance the sweetness, bringing out the flavors of the other ingredients and preventing the bars from becoming overly sugary.
When selecting ingredients, it’s advisable to choose high-quality brands that prioritize flavor. The freshness of the cream and yogurt, along with the quality of the Oreos, will significantly impact the final taste of your Cookies ‘n Cream Bars.
Step-by-Step Instructions
Creating your own Cookies ‘n Cream Bars is a straightforward process that requires only a few simple steps. Follow this comprehensive guide to prepare your delicious treats:
1. Gather Your Supplies: Start by assembling all the ingredients and necessary kitchen tools. You will need a mixing bowl, a spatula, a 9×9-inch baking pan, and parchment paper for easy removal.
2. Prepare the Pan: Line the baking pan with parchment paper, allowing some overhang on the sides. This will make it easier to lift the bars out once they are set.
3. Combine the Yogurt and Heavy Cream: In a large mixing bowl, combine the vanilla yogurt and heavy cream. Use a whisk or an electric mixer on low speed to blend the two together until smooth and creamy.
4. Add Sweetened Condensed Milk and Vanilla Extract: Pour in the sweetened condensed milk and add the pure vanilla extract. Stir the mixture until all ingredients are well combined, ensuring a uniform consistency.
5. Incorporate the Crushed Oreos: Gently fold in the crushed Oreo cookies, reserving a handful for topping if desired. Be careful not to overmix; you want to maintain the crunchy texture of the cookies.
6. Add Mini Chocolate Chips (if using): If you choose to include mini chocolate chips, add them to the mixture at this stage. Stir just enough to distribute them evenly throughout the batter.
7. Season with Salt: Sprinkle a pinch of salt into the mixture and give it one final stir. This step enhances the overall flavor profile of the bars.
8. Transfer to the Pan: Pour the cookie mixture into the prepared baking pan and spread it out evenly using a spatula. Press down gently to ensure the mixture is compact.
9. Top with Reserved Oreos: If you set aside some crumbled Oreos, sprinkle them on top of the mixture for an extra layer of crunch and visual appeal.
10. Chill the Bars: Cover the pan with plastic wrap or foil and place it in the freezer. Allow the bars to chill for at least 4 hours or until they are firm enough to slice.
This initial phase of preparing your Cookies ‘n Cream Bars sets the stage for a delightful frozen treat that will impress family and friends alike. With minimal effort and a handful of quality ingredients, you are well on your way to creating a dessert that encapsulates the essence of summer indulgence. Stay tuned for the next part of this article, where we’ll explore the slicing and serving of these delicious bars, along with tips for presentation and storage.
{{image_2}}
Preparing the Mixture
The foundation of any great dessert is a well-prepared mixture, and for our Cookies ‘n Cream Bars, this is no exception. Start by ensuring that your cream cheese is at room temperature, as this will allow it to blend smoothly with the sugar and vanilla. Using an electric mixer, combine the softened cream cheese with granulated sugar until the mixture is creamy and well-incorporated. This step is crucial; a lumpy mixture can lead to uneven texture in your final bars.
Once the cream cheese and sugar are mixed, add in the whipped topping and blend until you achieve a uniform consistency. The goal here is to create a smooth base that will serve as the creamy layer of your bars. Take your time with this step; thorough mixing is essential for a delightful mouthfeel.
Adding the Crunch
Next comes the fun part—adding the crunch! Fold in the crushed chocolate sandwich cookies and chocolate chips into your creamy mixture. To ensure that the cookies maintain their structure, use a spatula to gently fold them in rather than stirring vigorously. This method helps retain the integrity of the cookie pieces, giving your bars that delightful crunch in every bite.
Best practices for folding include working in thirds: add a part of the cookie mixture, fold gently, and then repeat until everything is just combined. Be careful not to overmix; you want visible chunks of cookies mixed throughout for that classic Cookies ‘n Cream flavor profile.
Transferring to the Pan
Once your mixture is ready, it’s time to transfer it to the prepared pan. Line an 8×8 inch baking pan with parchment paper, allowing some overhang on the sides. This will make removing the bars a breeze once they are set. When pouring the mixture into the pan, use a spatula to spread it evenly, ensuring that the top is smooth. Tapping the pan lightly on the counter can help eliminate any air bubbles and ensure an even layer.
Topping Off
For an extra layer of texture and flavor, sprinkle crushed Oreos on top of your mixture before freezing. This final layer not only adds visual appeal but also enhances the overall crunch of the dessert. Make sure to distribute the crushed cookies evenly across the surface for consistent flavor in every bite.
Freezing
Freezing is a crucial step in the preparation of these delicious bars. Place the pan in the freezer and allow it to set for at least 4 hours, or until firm. The freezing process transforms your creamy mixture into a sliceable dessert and helps meld all the flavors together. It also contributes to the delightful texture that contrasts the smooth and creamy base with the crunchy cookie layer.
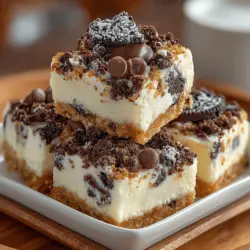
Cutting and Serving
After your bars have set, it’s time to cut them into squares. To achieve clean cuts, use a sharp knife and warm it slightly under hot water before slicing. Wipe the knife clean between cuts to prevent any messiness. The result will be perfectly square, visually appealing bars that showcase the layers of cream and cookie.
Storing Leftovers
If you find yourself with any leftovers (which is often a challenge with these irresistible bars), store them in an airtight container in the freezer. This will help maintain their freshness and quality. You can also separate layers of bars with parchment paper to prevent sticking.
Why These Bars Are a Must-Try
What makes these Cookies ‘n Cream Bars a must-try? The texture contrast is one of the biggest draws—each bite offers a delightful combination of creamy smoothness and crunchy cookie pieces. This recipe is also highly flexible; you can easily customize it with different mix-ins, such as nuts, dried fruits, or even different flavored cookies to suit your taste.
For those with dietary considerations, the recipe can be adapted to be dairy-free by substituting the cream cheese and whipped topping with plant-based alternatives. This means that everyone can enjoy these decadent treats, regardless of dietary restrictions.
Serving Suggestions
When it comes to serving these delicious bars, the options are endless. Pair them with a scoop of vanilla ice cream or a drizzle of chocolate syrup for an indulgent dessert experience. They also make for a stunning centerpiece at gatherings. Consider presenting them on a decorative platter, garnished with fresh berries or a light dusting of powdered sugar to elevate their appearance.
For a festive touch, serve them with a dollop of whipped cream and a sprinkle of crushed cookies on top. This not only enhances the visual appeal but also amplifies that beloved Cookies ‘n Cream flavor.
Nutritional Information
These Cookies ‘n Cream Bars, while indulgent, contain relatively wholesome ingredients. The cream cheese provides a source of calcium, and the chocolate sandwich cookies add a touch of sweetness without overwhelming the palate. While it’s important to enjoy these bars in moderation, they offer a balanced treat that satisfies sweet cravings without compromising on flavor.
Conclusion
In just a few simple steps, you can craft your very own Cookies ‘n Cream Bars that are sure to delight family and friends. This recipe combines the ease of preparation with the joy of creating something truly delicious. The creamy, crunchy contrast makes them an irresistible treat, perfect for any occasion.
So, gather your ingredients and get ready to chill out with these delightful bars. Homemade desserts have a way of bringing people together, and these Cookies ‘n Cream Bars are no exception. Enjoy the process, relish in the results, and don’t forget to share your sweet creation with loved ones. Happy baking!