
Crispy Delight Garlic Breadsticks: A Flavorful Introduction
Garlic breadsticks have carved a niche in the hearts of many as a beloved side dish, perfect for complementing a variety of meals. From casual gatherings to family dinners and pizza nights, these delectable treats elevate any dining experience. The allure of garlic breadsticks lies not only in their crispy exterior and soft, fluffy interior but also in their versatility. They can be served alongside pasta, salads, or simply enjoyed on their own with a rich marinara dip.
While store-bought options may offer convenience, nothing compares to the warmth and aroma of freshly baked garlic breadsticks coming straight from your oven. The homemade version allows you to control the ingredients and customize flavors to suit your palate. Imagine biting into a stick with a perfectly golden crust, infused with garlic and herbs, and a cheesy, gooey center—it’s a culinary experience worth every minute spent in the kitchen.
In this recipe for Crispy Delight Garlic Breadsticks, we will explore a harmonious blend of flavors and textures that will leave your taste buds wanting more. With a few simple ingredients and straightforward steps, you can create an irresistible appetizer or side dish that will impress your family and friends.
Understanding the Ingredients
To create the perfect garlic breadsticks, understanding the role of each ingredient is essential. Let’s take a closer look at the key components that will bring your breadsticks to life.
Fresh Pizza Dough: The Foundation of Flavor
The base of our delicious garlic breadsticks is fresh pizza dough. While you can certainly opt for store-bought dough for convenience, making your dough from scratch can enhance the overall flavor and texture. Freshly made dough is less processed and allows for a more authentic taste. If you choose to purchase pre-made dough, look for high-quality options from local bakeries or grocery stores that focus on fresh ingredients.
Garlic: The Star Ingredient
No garlic breadsticks would be complete without the robust flavor of garlic. Fresh garlic is preferable, as it provides a more intense and aromatic profile compared to garlic powder or jarred garlic. The sharpness of freshly minced garlic, when combined with butter and herbs, creates an irresistible aroma that fills your kitchen and beckons everyone to the dining table.
Herbs: Adding Depth of Flavor
Herbs play a critical role in enhancing the flavor of garlic breadsticks. Classic choices include dried oregano, basil, and parsley, which add a fragrant touch and depth to the dish. These herbs complement the garlic beautifully, creating a well-rounded flavor profile that transforms simple breadsticks into a gourmet experience.
Cheese Selection: The Creamy Indulgence
When it comes to cheese, a combination of Parmesan and mozzarella strikes the perfect balance between sharpness and creaminess. Parmesan adds a nutty, salty flavor that enhances the overall taste, while mozzarella provides the gooey, stretchy texture that we all love. Together, they create a delightful cheesy experience that elevates the breadsticks to a whole new level.
Optional Ingredients: Customizing Your Breadsticks
While the classic recipe is always a hit, you can easily customize your garlic breadsticks to suit your preferences. For those who enjoy a bit of heat, adding red pepper flakes to the garlic butter mixture can introduce a spicy kick. Additionally, consider incorporating toppings like chopped olives, sun-dried tomatoes, or even a sprinkle of everything bagel seasoning for a unique twist.
Preparation Steps Explained
Now that we’ve covered the essential ingredients, it’s time to dive into the preparation steps that will set the stage for your homemade garlic breadsticks. Following these instructions will ensure that your breadsticks come out perfectly crispy and full of flavor.
Preheating the Oven: The Importance of Temperature
Before you begin assembling your breadsticks, preheating your oven is crucial. A hot oven is necessary for achieving that wonderful crispy texture. Aim for a temperature of around 425°F (220°C) to ensure the breadsticks bake evenly and develop a golden crust. While your oven is heating, you can focus on preparing the dough and garlic butter.
Rolling Out Pizza Dough: Achieving the Perfect Thickness
Once you have your dough ready—whether homemade or store-bought—it’s time to roll it out. Lightly flour your work surface to prevent sticking, and use a rolling pin to stretch the dough into a rectangle. Aim for a thickness of about ¼ inch; this thickness strikes the right balance between a chewy interior and a crispy exterior. If the dough resists stretching, let it rest for a few minutes to relax the gluten, making it easier to roll out.
Preparing the Garlic Butter Mixture: Balancing Flavors
While your dough is resting, prepare the garlic butter mixture that will coat your breadsticks. In a small bowl, combine softened butter with minced garlic, dried herbs, and a pinch of salt. This mixture is the key to infusing flavor into the breadsticks. Adjust the ratios according to your taste preferences; if you love garlic, feel free to add more! Mixing the ingredients well ensures that every bite will be packed with flavor.
Importance of Even Coating for Flavor Infusion
Once the garlic butter mixture is ready, it’s time to spread it generously over the rolled-out dough. Use a pastry brush or the back of a spoon to ensure an even coating. This step is crucial, as it helps the flavors permeate the dough. Be sure to cover every inch, as this will enhance the overall taste of your breadsticks.
Creating the Perfect Breadsticks
Now that your dough is rolled out and coated, it’s time to shape your garlic breadsticks. The way you cut and shape the dough can influence both the presentation and texture of the final product.
Techniques for Cutting and Shaping the Dough
Using a sharp knife or pizza cutter, you can create your breadsticks in various styles. For a classic look, cut the dough into strips about 1 inch wide. If you want to add a bit of flair, consider twisting the strips before placing them on the baking sheet. Twisted breadsticks offer an appealing visual element and can create additional crispy edges.
Feel free to experiment with different shapes, such as knots or braided styles, to make your garlic breadsticks even more inviting. The key is to keep the thickness uniform to ensure even baking.
As you prepare for the final phase of this delightful recipe, remember that the joy of cooking lies in experimentation and personalization. The next steps will guide you through baking and serving your Crispy Delight Garlic Breadsticks, transforming your kitchen into a warm, inviting space filled with the irresistible aroma of freshly baked bread.
{{image_2}}
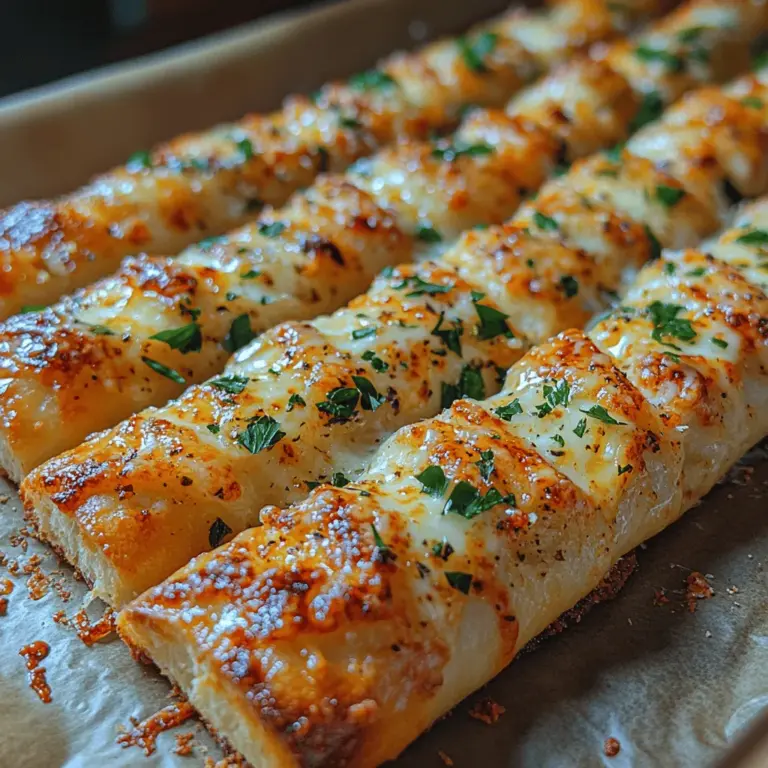
Presentation Tips for Cutting
When it comes to serving your crispy garlic breadsticks, presentation plays a pivotal role. To ensure each piece is not only visually appealing but also baked evenly, follow these cutting techniques:
Ensuring Even Sizes for Uniform Baking
1. Use a Sharp Knife: A sharp knife will help you make clean cuts without tearing the breadsticks. A dull knife can compress the bread, leading to uneven cooking.
2. Measure Your Cuts: For uniformity, consider using a ruler or measuring tape. Aim for 1 to 1.5-inch wide pieces. This size allows for a perfect balance between crust and chewy interior.
3. Cut Before Baking: Lightly scoring the dough before baking can help you achieve clean edges and even cooking. Don’t cut too deep; just score the surface enough to guide your knife during the final cuts post-baking.
Cheese Layering: Achieving the Perfect Cheesy Topping
For those who love a cheesy garlic breadstick, the layering technique is crucial:
1. Select Your Cheese Wisely: Mozzarella is the classic choice, but feel free to mix in some Parmesan or cheddar for added flavor.
2. Layer Strategically: After spreading your garlic butter mixture, sprinkle half of your cheese on the dough first. This allows the cheese to melt into the bread. Add the remaining cheese on top before baking for that gooey, golden finish.
3. Add Some Herbs: For extra flavor, consider sprinkling a bit of dried oregano or Italian seasoning on top of the cheese before baking. This not only enhances the flavor but also adds a beautiful aroma.
Baking to Perfection
The Baking Process
Once you have your breadsticks cut and topped with cheese, it’s time to bake.
1. Preheat Your Oven: Always preheat your oven to 400°F (200°C). A hot oven helps in achieving that perfect crispy exterior while keeping the inside tender.
2. Use the Right Baking Sheet: Line your baking sheet with parchment paper. This not only prevents sticking but also aids in even cooking.
3. Arrange Evenly: Place your breadsticks on the baking sheet with enough space between them to allow for expansion while baking.
Importance of Monitoring Time and Temperature for Ideal Results
1. Bake Time: Generally, your breadsticks will need about 12-15 minutes to bake. Keep an eye on them, as ovens can vary.
2. Temperature Check: If you notice your cheese bubbling and the edges of the breadsticks turning golden brown, it’s a good indicator that they are nearing completion.
What to Look for When Determining Doneness
1. Color: Aim for a golden-brown color on the cheese and the edges of the breadsticks. This is crucial for achieving that crispy texture.
2. Cheese Bubbling: A bubbling cheese surface is a clear sign that your breadsticks are ready. This not only indicates thorough baking but also enhances the flavor profile.
Cooling Tips Post-Baking
After pulling your breadsticks from the oven, allow them to cool for a few minutes on the baking sheet. This brief cooling period helps set the cheese and makes them easier to handle. Transfer them to a wire rack to cool completely if you want to maintain their crispiness.
Serving Suggestions
Ideal Accompaniments for Garlic Breadsticks
Crispy garlic breadsticks are versatile and can be paired with a variety of dishes. Here are some ideas:
1. Pasta Dishes: Serve alongside a creamy Alfredo or a hearty Marinara sauce for a classic Italian experience.
2. Soups: They make a great accompaniment to tomato soup or minestrone, adding a delightful crunch to your meal.
Dipping Sauces
Enhancing your garlic breadsticks with dipping sauces elevates the experience:
1. Marinara Sauce: A tangy marinara is a classic choice. The acidity cuts through the richness of the cheese.
2. Garlic Butter: A simple mixture of melted butter, minced garlic, and herbs can be a delightful dip.
3. Ranch or Blue Cheese Dressing: For a twist, try serving them with ranch or blue cheese dressing for a creamy, flavorful pairing.
Creative Serving Ideas for Gatherings or Family Dinners
1. Charcuterie Board: Incorporate your garlic breadsticks into a charcuterie board, pairing them with cured meats, cheeses, and olives for an impressive display that’s perfect for entertaining.
2. Pizza Night: Serve them as an appetizer during pizza night, allowing guests to dip them into their favorite sauces while waiting for the main course.
Presentation Tips to Enhance the Dining Experience
– Garnish with Fresh Herbs: Sprinkle some chopped parsley or basil over the top just before serving for a fresh touch.
– Serve in a Basket: Place your breadsticks in a lined basket or on a wooden board for a rustic presentation.
– Use Attractive Dishes: If you’re serving sauces, use small ramekins or dipping bowls that complement your table setting to enhance the visual appeal.
Nutritional Information
Overview of Nutritional Content
While crispy garlic breadsticks are a delicious treat, it’s important to be aware of their nutritional content. On average, one serving (about 2 sticks) contains:
– Calories: Approximately 250-300
– Fat: 12-15g
– Carbohydrates: 35-40g
– Protein: 7-10g
Discussion of the Balance Between Indulgence and Portion Control
Enjoying garlic breadsticks can be part of a balanced diet. To indulge without overdoing it, consider:
– Portion Control: Stick to one or two breadsticks as a side to your meal rather than making them the centerpiece.
– Pair with Healthy Dishes: Balance the richness of breadsticks with healthier options like salads or grilled vegetables.
Potential for Modifications for Dietary Preferences
1. Gluten-Free Options: Substitute all-purpose flour with a gluten-free blend to cater to gluten-sensitive diners.
2. Vegan Alternatives: Use plant-based butter and a dairy-free cheese alternative for a vegan-friendly version that doesn’t compromise on flavor.
3. Low-Carb Variants: For a low-carb option, consider using cauliflower dough or almond flour to create a breadstick that fits into a low-carb lifestyle.
Conclusion
Making crispy garlic breadsticks is not only a rewarding cooking project but also brings joy to any meal. The satisfaction of pulling a tray of perfectly golden, cheesy breadsticks from the oven is unmatched. These delightful treats pair wonderfully with a variety of dishes, making them a versatile addition to your culinary repertoire.
Whether you’re preparing them for a family dinner, a casual gathering, or as a snack for yourself, the process of making garlic breadsticks is simple yet fulfilling. Experiment with different ingredients and presentation styles to make them your own.
So grab your apron, gather your ingredients, and dive into this fun cooking project that’s sure to impress. Embrace the deliciousness of garlic breadsticks and enjoy them as a comforting addition to any meal or occasion.
