Go Back
No-bake desserts are a treasure in the culinary world, offering numerous advantages that cater to the modern lifestyle. First and foremost, they save time. With no need to preheat the oven or monitor baking times, you can whip up a delicious treat in a fraction of the time it would normally take. This convenience is especially beneficial for busy weeknights, last-minute gatherings, or when unexpected guests arrive.

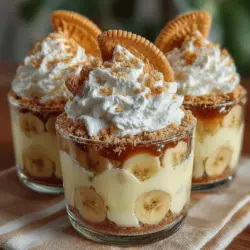
No-Bake Banana Pudding Cups

Discover the joy of Banana Bliss No-Bake Pudding Cups, an easy and delightful dessert that requires no baking! Perfect for busy days, this sweet treat combines ripe bananas, creamy vanilla pudding, and fluffy whipped cream, layered with crunchy vanilla wafers for added texture. Made with just a few simple ingredients, these pudding cups are customizable to suit your taste. Ideal for any occasion, they promise smiles and seconds from family and friends!

Ingredients
  

2 ripe bananas, sliced

1 cup vanilla pudding mix

2 cups milk

1 teaspoon vanilla extract

1 cup whipped cream (store-bought or homemade)

1 package (about 8 oz) of vanilla wafers

Optional: extra banana slices and crushed vanilla wafers for garnish

Instructions
 

Prepare the Pudding: In a medium mixing bowl, add the vanilla pudding mix and pour in the milk. Using a whisk, combine them thoroughly until you achieve a smooth consistency. Then, incorporate the vanilla extract and mix until well blended. Allow the mixture to sit undisturbed for about 5 minutes, which will help it thicken.

    Fold in Whipped Cream: Carefully add half of the whipped cream into the thickened pudding mixture. Using a spatula, gently fold it in by sweeping from the bottom of the bowl to the top, ensuring you incorporate the cream without deflating it. This step will make the pudding light and airy.

      Layering the Cups: Take clear cups or ramekins for serving. Start by adding a layer of vanilla wafers to the bottom of each cup. Next, arrange a layer of the sliced banana over the wafers. Follow this by adding a generous layer of the pudding mixture, and finish with a dollop of whipped cream perched beautifully on top.

        Repeat the Layers: Continue this layering process in each cup—another layer of vanilla wafers, bananas, pudding, and whipped cream. Make sure that the final layer is a lush dollop of whipped cream. For a decorative touch, place an extra banana slice on top and sprinkle crushed vanilla wafers for an appealing garnish.

          Chill: Cover each pudding cup tightly with plastic wrap to prevent any odors from the refrigerator affecting their flavor. Refrigerate the cups for at least 2 hours. This chilling time allows the flavors to meld beautifully and allows the wafers to soften, enhancing the overall texture.

            Serve: Once the cups have chilled and are ready to enjoy, carefully remove them from the refrigerator. Serve them chilled for a refreshing treat.

              Prep Time: 20 minutes | Total Time: 2 hours 20 minutes | Servings: 4

                - Serving Suggestion: Present the pudding cups on a decorative platter for added elegance, and feel free to personalize each cup with unique toppings based on your preference!